Saturday, 24 February 2024

Maurice Joins the Family, all 702 cubic inch of him! Update #1


Welcome to the 2024 Update / Launch of my neglected blog. On the car front nothing much happened between 2015 and November 2023. The poor old Humber didn’t get any love, (which is now up for sale), just became an ever growing pile of stuff, blankets, rolls of carpet etc, etc. The 1947 Studebaker pick up got an engine freshen up, some head work, new gaskets and a new carb. It’s currently laid up getting a front end rebuild.

But the big news is the addition of Maurice to the stable. (We name our cars based on the name of the previous owner, he didn't look like a Nev, so it would be Morris, but with the monocle windscreen making him look distinguished so we decided on Maurice). I was always fascinated by the 1920’s and ‘30’s aero engine cars and knew the possibility of one being available in Australia was pretty remote. Thus, I started to build the Humber Speedster back in 2013. THEN in November last year I heard of a deceased estate sale happening in Dalby, about 2.5 hrs drive west of Brisbane. I saw some photos of what was for sale and WoW, some large engine cars, I had to go!

A gentleman, by the name of Neville (Nev) Morris had passed and his substantial collection of machinery was being auctioned off. Of particular interest to me were two large engine cars, hand built by Nev. To better explain who Nev was, below is a link to a hot rod magazine article from March 2013.

https://www.streetmachine.com.au/features/neville-morris-custom-creations?fbclid=IwAR0dtaPLcKaZuhCvExYdvmT-THK6GvhQ_kKn_ZbkLp6xGNwAGlB19cVEK7U

I was initially interested in the black car called, ‘SOG’ (Shades of Grey), but a local museum was buying a selection of Nev’s vehicles and inventions to honour him with a permanent display, also I fell in love with the blue car – ‘NOBA’. Which apparently stands for, ‘Not Only But Always’, and old English saying. Nev had a sense of humour as eclectic as his machine collection! I have decided to change its name to, ‘GMC Bearcat’. Why? I hear you ask. While going through Nev’s papers on the car I found a photograph of a 1914 Stutz Bearcat, I guess as his inspiration, so it seemed logical. 

Maurice was hand built by Nev as his tribute to those same aero engine cars that I liked. It's fitted with a GMC 702 cid, (11.5 lt), V12, used in 1960's GMC 7000 series trucks. The gearbox is from a Commer truck and the chassis a Toyota Dyna truck. 

My goal is to get the Bearcat legally registered for road use, this will entail quite a bit of finishing to make it compliant for a Road Worthy Certificate. Plus, there is some maintenance work to be done, a leaking rear axle seal, the brakes don’t work, and a carby (x2) rebuild, oil and filter change.

Joining some car Facebook sites has created a lot of interest with people asking to be kept informed on the progress, so my reason to update my blog to keep people in the loop.

                                     I took this video at the auction before purchasing Maurice.


                                     Now Maurice was safely tucked up in my workshop.


Saturday, 20 August 2016

General Update


Hi all, well to both of my blog readers, ( my wife and I  ;-) )

It’s been a while since I posted a Humber Update, I’ve been busy with all the other projects,  so thought I’d post about them. I was working on the Humber, (fitting the  1916 T Ford mudguards/fenders), which turned out trickier than I thought. I started by trying to fit the front ones, when it soon became obvious I should have started with the rear guards. To do this I had to mount the running boards to get the correct height, then it became obvious again the rear T Ford guards were not long enough at the front to reach the running boards. It’s a bit like that old kid’s song – ‘There’s a hole in the bucket dear Liza, dear Liza’. So, I had to make panels to fill in the gap between the guard, of course these had to be rolled to the same diameter on the edges the same as the Ford guards, otherwise it would look shit. I did buy a bead roller before I started the Humber project to put beads in the upper parts of the body panels, which I didn’t because it would have been a nightmare to try and do – my skill levels aren’t up to that. Anyway the bead roller was the perfect tool to make the rolled wire edges, BUT! I didn’t have the right rollers. I purchased a set from where I bought the roller itself, unfortunately their set was for a smaller gauge wire edge than what was on the T Ford guards – Bugger !  So I called on my inner Fitter and Turner and made up a new flat roller and widened the gullet roller. Oh, the other thing I did was to adapt a winch motor onto the bead roller so I didn’t have to ask someone to wind the handle for me - my boys either wound it too fast or too slow....


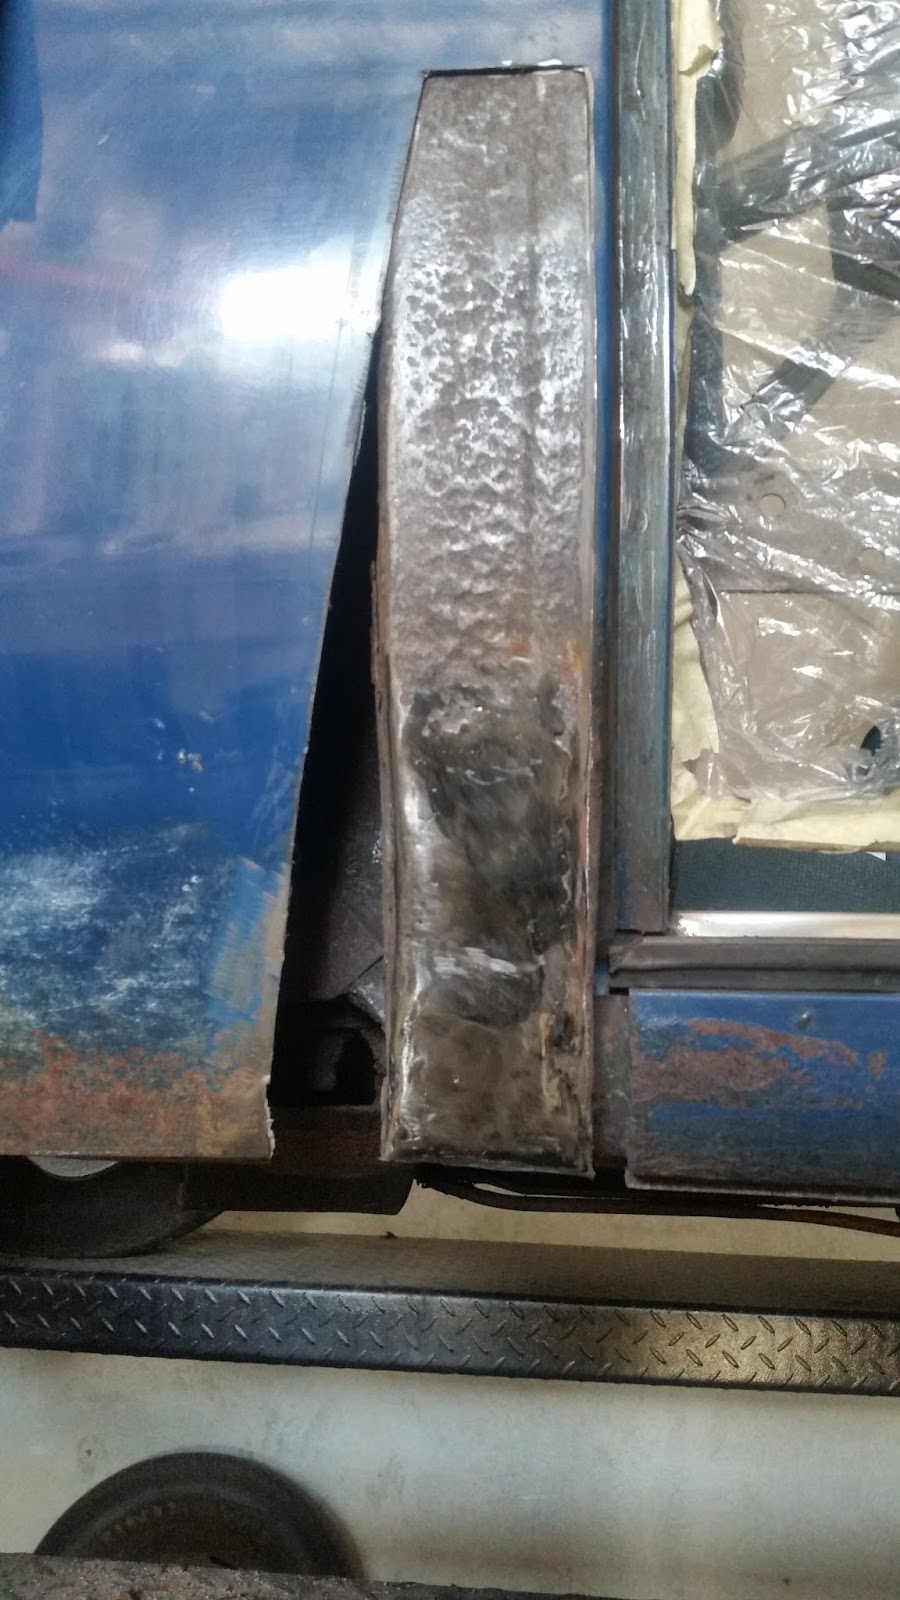
It was about this time that the auto body guy who I had lined up , (two months previous),to cut the rust out of the 1955 Studebaker bailed on me – if you are reading this Richmond, you Sir are an Arsehat, and so is your mate you recommended me to, wanting twice the price and heap of conditions. Then after the third guy messed me around I thought, ‘Hey, I can weld, I can manipulate metal, I’m gonna give it a go’ !!!  So that is another project taking up my time at present.  The third project is the cut-away engine I’m making for the Studebaker shop as a promotion tool. After putting the word out Dick Adsett donated two 1948 Studebaker six cylinder engines, both were in bad shape, but hey I’m going to cut holes in them ;-)  The plan is to take a sectioned engine to car shows on a frame in the tray of my ’47 MR Studebaker pickup, and run them on three cylinders with all the moving parts exposed.  So without further ado, please see the pics below of my time killers.
Flat and wire edge roller.


Rear left hand guard showing gap.


Front LHS guard of '55 Stude


With rust removed


LHS sill with rust cut out


LHS Sill with patch welded in


Cut-away 6 cyl


Head sectioned and in place on Stude 6 cyl.


Friday, 25 December 2015

Humber Speedster Project - Update # 12


It’s been a couple of months since my last update and to be honest I’ve neglected the Humber a bit. I can claim other pressing distractions; shifting the 'Studebaker of Australia' stock from our off site storage shed to the warehouse beside the shop, and my main business required my attention more than usual to sort out some issues. Poor Huber` was shunted down the priority ladder a couple of rungs. It’s now looking clear he won’t be finished for the National Humber Rally next March, which really grates on me but I just won’t put him on display unfinished.

I ended the last update with the photos of the completed trunk and the steel body frame, the next project was to take the dash mock up to the finished article. I carefully drafted the instrument and switch positions, picked out the best grained plywood and marked the hole centres, held my breath and cut. (hole sawed actually). All went smoothly, UNTIL!!!! I did a test fitting to the scuttle frame – I had miss read one of the measurements and cut all of the holes 60 mm (2 1/2’) off centre. Damn and Blast !!! Luckily I had enough ply left over to make another one, and consoled myself the first was just a practice run. ;-)
 
The practice run....


The second try was a success


With the dash finished came the job I had been putting off – sheeting the body. Actually it went pretty well. The bonnet (hood) didn’t go as well, and I’m still working to get the outer edge how I want it. There was a small issue where the scuttle sheeting folded around the firewall. I hadn’t allowed for the firewall being on a three degree lean, therefore causing a gap between the sheet metal and timber. The obvious solution was to cut and weld, but rather than go for the grinder I decided to make the complete bonnet and re-evaluate then. Of course as this project has always two steps forward and half a step back I realised I needed to fit the front mudguards (fenders) before I could get the correct size of the bonnet side panels. I had bought two old sets of 1916 T Model Ford front and rear guards from a swap meet some time ago intending repair and use them, but after having them sand blasted I realised they were too far gone. The new reproduction guards arrived from the USA arrived some three weeks later. I was pretty disappointed in the condition they arrived in, brand new guards with rusty hand and finger marks all over them. This could have easily been avoided at the factory by the workers using gloves or some anti-corrosion film. Poor form Rootlieb Inc, poor form. I cleaned them down with phosphoric acid then undercoated them to stop further corrosion.

Front guards straight out of the box.

Rear guards straight out of the box.


Side sheet in place for marking the door cut outs.

Door cut outs done, now in place for fixing.

Folding over the top edge.

Body tub clad, now for the scuttle top and bonnet.

The trickiest job so far - getting the outer edges and curve right.


When I went to fit the guards I couldn’t understand why T Model Ford guards didn’t just bolt straight on a 1932 Humber ;-)  I expected some modifications, but not as much as it took! Oh well, just get on with it – my workshop guillotine and folder got a work out. I had to fold up a 4" (100mm) fill in piece so the bonnet side panels would clear the guards, and the mounting plates.

Filler panels & mounting plates 

 
To get the final position of the guards required the headlight supports to be in place, another interconnected job. (The guards have to have the correct position forward & back, height off the wheel to allow for travel and distance from the body to ensure a balanced look, AND the same height as the rear guards so the running boards are level with the car - another 3D jigsaw with no picture guide ;-). As the original headlights are being used I have to use the original support risers that were bolted to the chassis and crossed braced from each guard. The pre 1920’s look I was going for didn’t lend itself to the cross brace so that will be deleted, the headlights will be supported by a pipe welded to new chassis brackets. (the original support pipes were rusted beyond repair, but luckily were directly replaced with ½” water pipe, even the threads in the original mounts under the headlight buckets were ½” British Standard Pipe thread). One of the old T ford guards I bought had its original bracket so I used that as a template for the new ones, sized up a bit it as it looked quite flimsy. I set about to fabricate the combination Mudguard / head light support with ¾” round bar for the guards and 2” x ¼” angle iron for the chassis mount. (The T Ford brackets were tapered from the chassis mount to the guard end from ¾” to ½” which made the flimsy look). But when I placed the ¾” bar up in place it look way to bulky – no wonder Henry Ford’s design team made them tapered.   ;-)    Once again the Gods of Engineering took pity on me and allow the bar to JUST fit in my lathe so I could turn a taper on it - Now they just have to be bent to follow the contour of the guards then welded in place.

Turning the taper on the mudguard bracket.

The head light and guard brackets, using the original adjusting knuckles.


As it looks today.


Just waiting for the head light install.

Thursday, 10 September 2015

Humber Speedster Project - Update # 11


The last sentence in my previous Blog entry was, 'The next job is fitting the sheet metal skin – Yikes!’. Well like most of my well laid plans it didn’t quite go according to plan. What seems to happen is that I intend to start a certain project but get side tracked and do something else, which doesn’t really worry me as it all has to be done sooner or later. While I was waiting to have the 15 mm lip folded on the sheet metal side panels by a sheet metal shop, (I was going to do them myself until I found my folder was too short and I couldn’t slide them in from the side). I started to plan the fuel tank cradle and trunk, I had not given this much thought up until now as my main concern was getting the front of the car planned and started. But after sitting beside Hubert and seriously thinking about the look of the back end of the car would really have an impact on the overall look. Maybe this is why a lot of pre- 1920’s cars I looked at have an awkward look about them in the rear section, like the builders realised, like I did, ‘damn, we really didn’t think this through, what do we do now?’ In the initial planning stages I had briefly thought of a boat tail end, but on investigation it was a LOT of work, so decided on a basic exposed fuel tank and attached trunk.  OK, back to me sitting beside Hubert wondering what was I going to do??? This was the time I took a leaf out of Svenja’s book and ‘let it speak to me’, which is an tenet she uses when designing her wondrous costumes.  A trip to the hardware to check out what timber I had to play with and what would suit. I guess the sight of me standing there with a sheet of paper in hand and a thoughtful look on my face it was inevitable I was going to be approached by one of the helpful staff.  ‘Can I be of service?’ asked a fresh faced young lady, I hesitated just for a millisecond about whether I should ask her if the sheet on ply I was looking at would be suitable for skinning the trunk of a 1916 Humber Speedster…… but decided to say, ‘no thanks, I’m OK’.
While I was perusing all the different timber products I formed a plan… yes another one ;-)  I’d use form ply for the structural parts, sides and supports then pine boards for the floor, topped off with a plywood top cover.


Making up as I go along

Trunk ready for skinning

A trial fit for of the ply wood skin.


The fuel tank cradle was fairly straight forward, the shape and size dictated by the tank side, (a re-purposed automotive LPG tank). The sides of the trunk took some design time with my co-designer Svenja with her talent at drawing curves she soon had the drop away to the rear of the chassis sorted. I had decided to make the floor out of 19 mm (3/4”) solid pine in various widths with the edges cut at angles to follow the contour of the chassis and give a sealed surface, much like barrel staves. It was then onto the ply wood ‘skin’, this had to curve to follow the drop away, so it was ‘Kerfed’. This entails numerous saw cuts made across the grain to a depth just under the outer layer which allows the timber to be bent. Getting the depth and the distance between cuts is important to allow the timber to bend freely but not to crack or show creases. This process works well but also removes a lot of the integral strength of the ply wood sheet so extra supports had to be added to compensate. 

 
Liam with the top skin.

Kerfing detail


Access to the trunk was also added by cutting the door hole which is supported internally at the edges by form ply braces, the lid will come later.
In between waiting for the glue to dry on the trunk floor the dash board was mocked up using a piece of ply wood scrap the same thickness as the finished piece. 
 
The mocked up dash


Steering column bracing

 This wasn’t just a matter of sticking a piece of ply up in the scuttle opening, the recess and angle of the dash plus the position of the gauges had to be set to suit the eye line of the driver. This done, along with welding the mounting tags to the scuttle frame, the gauge positions were measured and noted so a holes can be cut in the final ply wood dash after lacquering.


Well that’s about where I’m up to at present, I should cover the sheet metal fixing in the next blog entry – hopefully !